2018 September 9
Filters for visual observing of the Moon and planets
Introduction
If you are new to astronomy and wish to see as much detail as possible on the planets of the solar system, or even if one has been observing solar system objects for some time, it may come as a surprise to find that coloured filters can make a world of difference to your observing clarity. Using filters can revolutionize your observing as coloured filters bring out additional detail from the subtle shadings found on solar system objects. This tutorial builds on the excellent tutorial by Paul G. Abel, and looks in more depth at the filters most commonly used by visual observers of solar system objects.
Many astronomical suppliers provide these filters, and all filters are identified firstly by their colour, and secondly by particular numbers or a # which are known as Wratten numbers. These allow the observer to choose which parts of the spectrum they are going to enhance in order to make planetary and lunar definition stand out. The principle of the filters come from black and white photography in which complementary or “opposite” colours enhance the contrast visible. When juxtaposed, complementary colours make each colour seem more vivid and defined, enabling particular coloured features to stand out against the background hues. So, a red or orange filter will enhance blue features and a blue filter will enhance red features.
The Wratten system was developed in Britain in the early 20th century by Frederick Wratten and Kenneth Mees who founded a company in 1906 that produced gelatin solutions for photography. Mees then developed gelatin filters dyed with tartrazine to produce a yellow filter, but soon developed other colours and a panchromatic process of photography. In 1912 they sold the company to the American company Kodak, with their British offices at Harrow in England and Mees moved to New York to found the Eastman-Kodak laboratories there. In honour of his partner and mentor, Kenneth Mees named the burgeoning number of coloured filters “Wratten” and introduced the complex numbering system that is still in use today. Not all the Wratten filters are suitable for astronomical use, but the main colours are still widely used in visual astronomy and are detailed in this tutorial.

These coloured filters are known as broadband or “longpass” in that they allow a wide range of wavelengths through but block wavelengths above or below a certain point in the electromagnetic spectrum. As the spectrum of visible light lies between 390 and 700 nanometers (nm), with the blue wavelengths being the shortest (~400nm) and the red being the longest (~700nm). Anything with a wavelength range above or below a particular filter will be blocked and increased contrast in compensating colours will be noticed.
Most astronomical suppliers sell complete sets of filters for solar system observing and naturally such sets are known as lunar and planetary filters. They generally have a range from red to blue across the spectrum and cover the broad bandwidths associated with such colours. A typical set will include a neutral density filter for lunar observing and a No. 25 red, No.12 yellow and No. 80A blue for as full coverage as possible. A typical filter set is shown here in figure 1. A more extensive set of astronomical filters with typical Wratten numbers can be seen here in figure 2.
This tutorial will introduce each filter and instruct the reader on which targets in the solar system each filter can be used and what features the filters will enhance Keep in mind that visual acuity does vary from observer to observer and that in the dark the sensitivity of the human eye shifts to the blue end of the spectrum. This is due to a phenomenon known as the Purkinje effect, named after the Czech doctor who discovered that the spectral sensitivity of the human eye does not enable red light to be seen clearly in the dark, but shorter blue wavelengths are detected.
Technical aspects of Filters
Filters can be separated into a few main groups that enable enhancement, lessened contrast or can be used for colour shift or balance. Colour subtraction filters work by absorbing certain colours of light, letting the remaining colours through. They can be used to demonstrate the primary colours that make up an image or can be seen in the features of our planetary neighbours. A colour correction filter makes a scene appear more natural by simulating the mix of colour temperatures that occur naturally, and subtly enhancing the middle ranges of the spectrum.
In addition to these filters, there are also colour temperature filters. Some filters change the correlated colour temperature of a light source. They can change the appearance of light from a bright white source so that it looks more yellow and natural to the eye. The term colour temperature comes from the natural phenomenon of coloured light emitted by warm objects. Warm objects, such as a flame from a fire, emit deep red and orange light. The temperature of such flames are roughly 1500K. If you increase that temperature the light emitted begins to look more blue as its wavelength changes to the shorter (hotter) or blue end of the spectrum.
Of course, optical filters don’t really change the temperature of the object emitting the light. Colour temperature filters simply remove some of the light of wavelengths of our choosing so we can absorb or reflect away some of the orange and red light emitted by the planets. This makes the remaining light look more blue and therefore has a higher colour temperature. Conversely, some filters can remove some of the blue light emitted by a planet, making the remaining light look more orange and thus apparently emitting a lower colour temperature.
Wratten filters and their uses
In the following tutorial, I have grouped the filters under their colour designation rather than put them in number order, as the colour of each filter is their most obvious feature when using them. All of these filters are available to purchase in 37.1mm (1.25”) or 50mm (2”) fittings and are commonly available from astronomical suppliers. For a fuller description of Wratten filters, please follow this link: https://en.wikipedia.org/wiki/Wratten_number. In this tutorial, only those filters useful to astronomers will be described.
One question commonly asked is “do filters block out too much light and make observing more difficult or less enjoyable?” It is true that filters do block out some light, but I hope you will see from this tutorial that by selectively blocking out certain wavelengths of light, and by altering the contrast of any surface features, the observer is often able to resolve finer or more subtle detail. In fact, in the case of bright objects the reduction in light transmission is an advantage. Let us examine this a little more technically.
The difference in contrast between the belts and zones on an object such as Jupiter can be so small that the human eye and brain just smear the whole and it can be difficult to discern details without a filtered system. Because Jupiter is a very bright object seen against a dark background, the differences in intensity of reflected light from light/dark zones on such planets is not really seen to advantage by the human eye.
Contrast in any system can be measured using the formula:
C = (b2 – b1) ÷ b2
Where C is the contrast and b1 and b2 are different areas of brightness on the surface of a planet. Bright areas on Jupiter have an intensity of 6 lumens m-2 and the intensity of the darker zones have an intensity of 3 lumens m-2. This would give:
(6 – 3) ÷ 6 = 0.5
or a visual contrast 50% lower in the darker zones than in the brighter zones. A filter will enhance the contrast by permitting wavelengths representative of the redder or darker zones through whilst diminishing the blue contrast on the brighter zones. Surely a filter that would aid in the perception of subtle features is going to be a bonus to any observer?
This tutorial will convincingly show that the use of filters, despite their decrease in light transmission is actually very useful in visual astronomy. The use of filters assists primarily in enhancing contrast initially and although the reduction in light transmission is generally not favoured in astronomy, this is one area in which this general rule need not apply.
 No. 25 Red
The No. 25 filter reduces blue and green wavelengths, which when used on Jupiter or Saturn, result in well-defined contrast between some cloud formations and the lighter surface features of these gas giants. However, it needs to be used judiciously as the light transmission is only 15% but for such bright planets this filter will enhance the observed detail even when used with small telescopes. This filter blocks light shorter than 580nm wavelength. This filter is also sometimes referred to as a Wratten 25A.
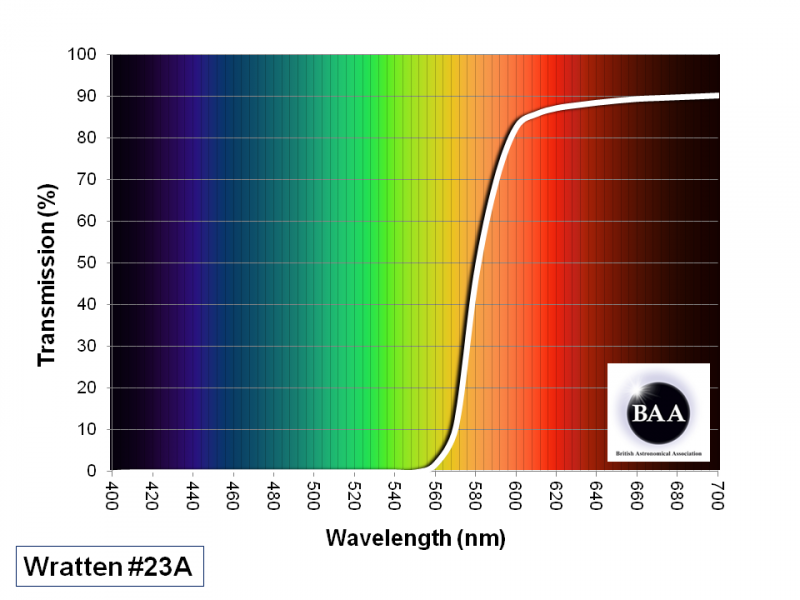 No. 23A Light Red
This is a good filter for use on Mars, Jupiter, and Saturn, and has proved useful for daylight observations of Venus as it has a 25% light transmission. The light red is an “opposite” colour to blue and therefore darkens the sky very effectively in daylight. Some astronomers report that it also works well on Mercury, but I would not recommend viewing this planet in general during daylight due to its proximity to the Sun. This filter blocks wavelengths of light shorter than 550nm.
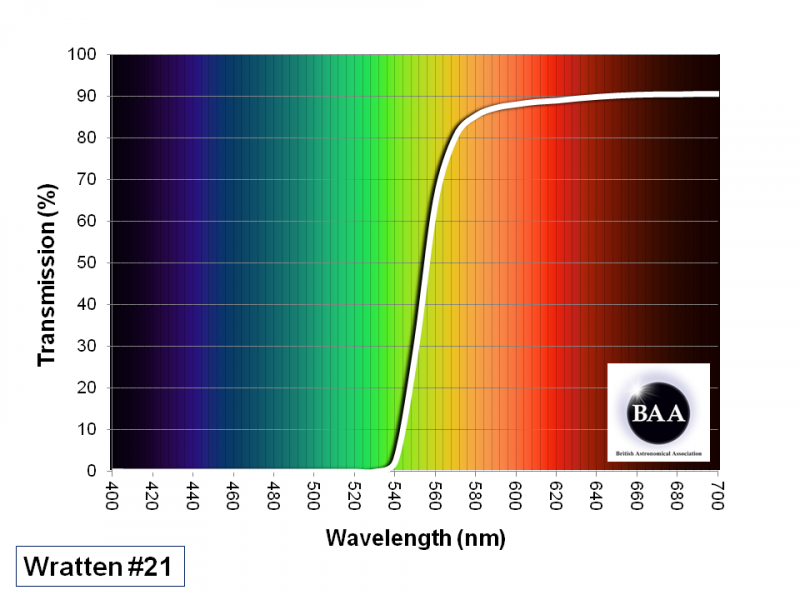 No. 21 Orange
This orange filter reduces the transmission of blue and green wavelengths and increases contrast between red, yellow and orange areas on planets such as Jupiter, Saturn and Mars. It brings out the glories of the Great Red Spot on Jupiter very well under conditions of good seeing with a medium magnification (e.g. x100). It also blocks some glare from the bright planet and provides less of a contrast between a planet and the black background of space. A good all round planetary filter as it transmits about 50% of the light and blocks wavelengths short of 530nm.
 No. 8 Light Yellow
This filter can be used for enhancing details in red and orange features in the belts of Jupiter. It is also useful in increasing the contrast on the surface of Mars, and can under good sky conditions aid the visual resolution on Uranus and Neptune in telescopes of 250mm of aperture or larger. The No. 8 cuts down glare from the Moon and works much better than the “moon filters” included with some cheaper telescopes. This filter allows 80% of the light through but blocks light short of 465nm.
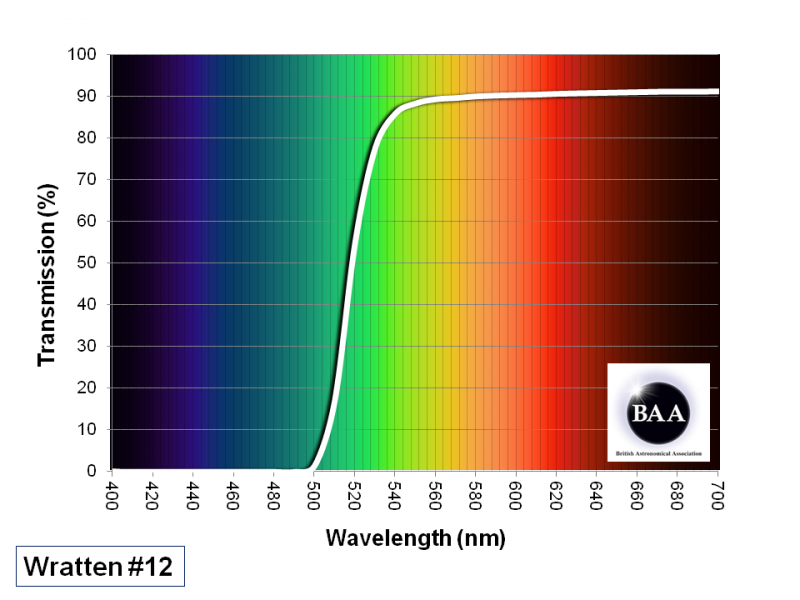 No. 12 Yellow
This filter works on the principle of opposites described above, blocking the light in the blue and green region and making red and orange features on Jupiter and Saturn stand out clearly. Deeper in colour than the No. 8 filter, it is the filter most astronomers recommend for visual work on the gas giants. It has a 70% light transmission and cancels some of the glare on Jupiter when seen against a dark background sky. It blocks visible wavelengths short of 500nm.
 No. 15 Deep Yellow
This filter can be used to bring out Martian surface features, especially the polar caps and can be used to bring out detail in the red areas of Jupiter and Saturn. Some astronomers also have reported some success using this filter to see low-contrast detail on Venus. I have used this filter on Venus during the day to add more contrast to the image and it generally works well. This filter is particularly useful for visual observations of Venus as it is a very bright object and the filter can considerably reduce the glare of this very bright planet in evening or morning apparitions despite its 65% light transmission. The No 15 blocks light short of 500nm.
Although at this point it may feel like every filter suits Jupiter and Saturn, the variegated nature of their surfaces and their extreme brightness at opposition or during favourable apparitions enables a wide range of filters to bring out different details. Some of the details may be subtle, but can be explored better by an experienced observer equipped with a range of filters.
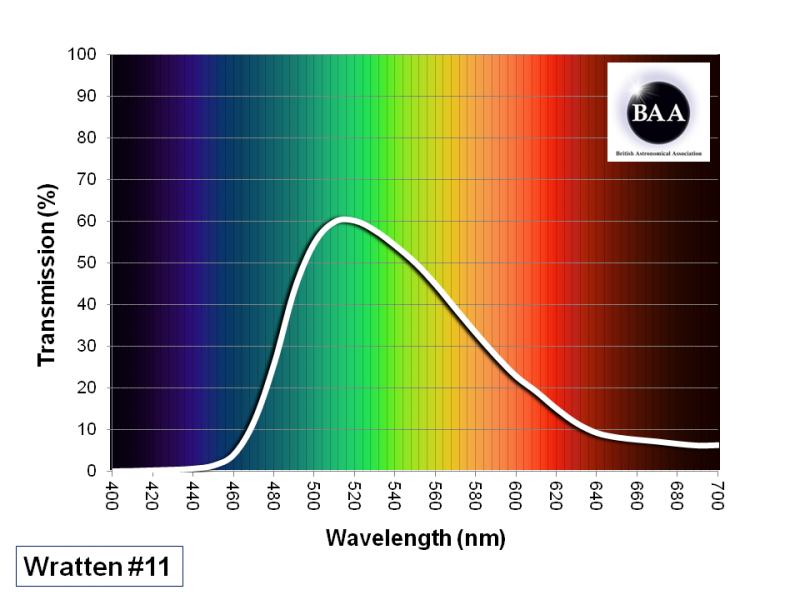 No. 11 Yellow-Green
This darker filter is a good choice to enable the observer to directly see surface details on Jupiter and Saturn. It can also be useful on Mars if you are using a large aperture telescope in the 250mm range. At times of steady atmospheric seeing, this filter darkens the surface features and makes areas such as Acidalia and Syrtis Major stand out and the polar caps and occasional features such as clouds appear quite marked. The No. 11 filter allows 75% light transmission can be used to darken some features on the Moon.
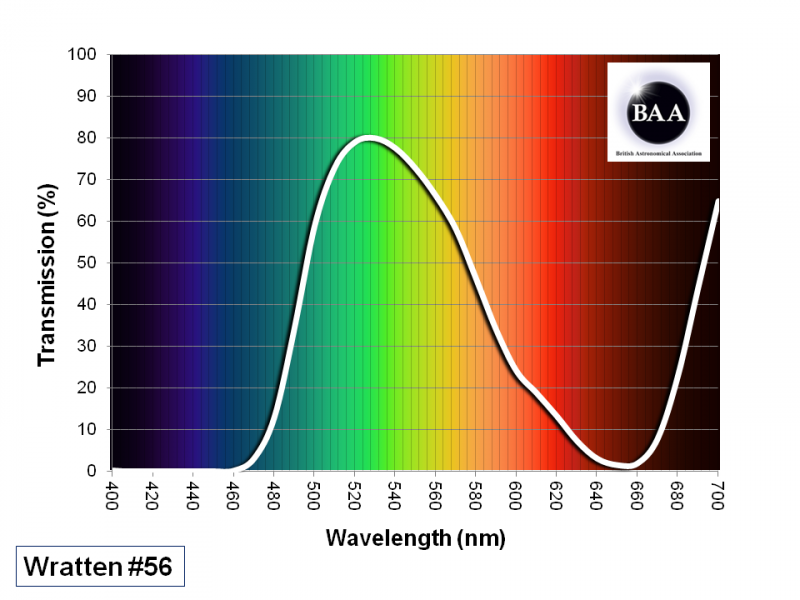 No. 56 Light Green
With its 50% light transmission this filter is a favourite of lunar observers as it increases the contrast while reducing the glare. It is also a filter that is well tuned to the wavelengths of the human eye and the greenish cast can almost be ignored during visual observation. This is a colour correction filter with all wavelengths equally affected. The effect can be seen on the first quarter moon in figure 3 photographed here in ordinary white light and then through the Wratten No 56 filter.
 No. 58 Green
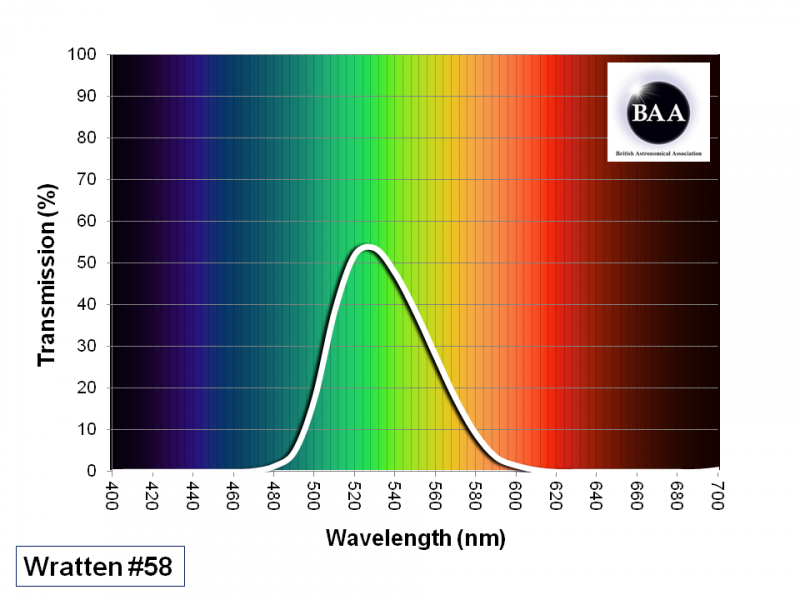
The No 58 filter has a 25% light transmission, and it is a colour correction filter rather than a longpass. Such filters alter the colour temperature of the incoming light, enhancing contrasting colours in the object by allowing specific wavelengths through that correspond to the temperature of the light. This is a complex subject but to put it simply, the colour of light not only corresponds to particular wavelengths but also to particular colours where blue is cooler and red is hotter. Note that this is more of a perception than anything else as in reality blue light is “hotter” (has a higher frequency and shorter wavelength) than red light.
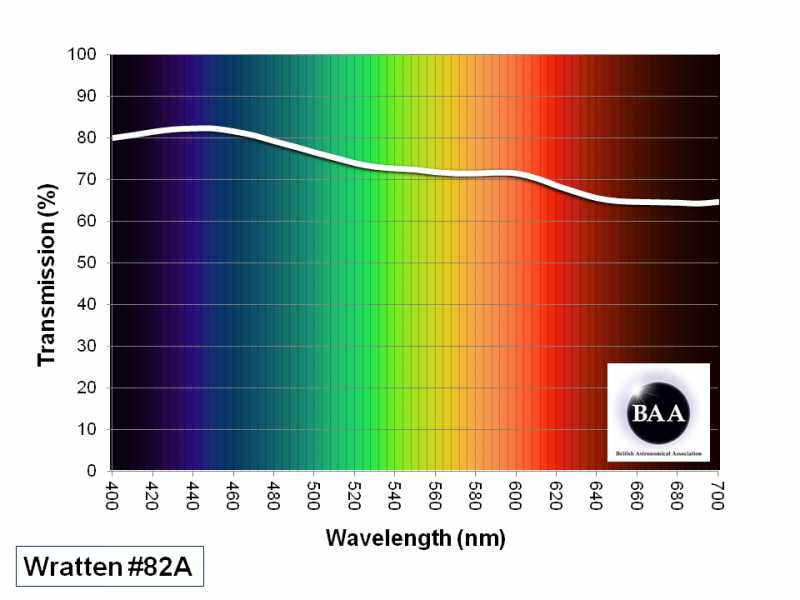
No. 82A Light Blue
This is almost a multipurpose filter as it does enhance some features on Jupiter, Mars and Saturn and also works very well in enhancing some features on the Moon (figure 4). It is commonly referred to as a “warming” filter that increases the colour temperature slightly and allows the red wavelengths through due to the complementary colours that we discussed above. With a light transmission of 75% it can be used on any aperture telescope and can even make some difference to deep sky objects such as M42 and M8 though the effects can be quite subtle.
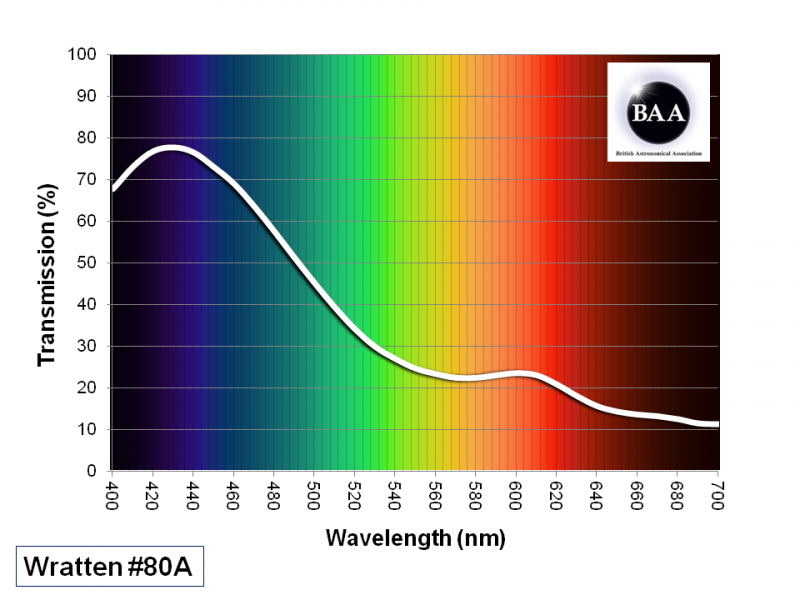 No. 80A Blue
Although this is quite a dark filter, it is as versatile as the No 82A in that it enhances features in the red on planets such as Jupiter, Saturn and Mars. It is also good for lunar observation as it reduces the glare and provides good contrast for some features such as ejecta blankets, ray systems and lava fronts. Some astronomers report success in its use on binary star systems with red components such as Antares and α Herculis as the contrast enables the observer to split the two components well. The No. 80A filter has a 30% light transmission and also acts as a colour conversion filter enhancing wavelengths around 500nm.
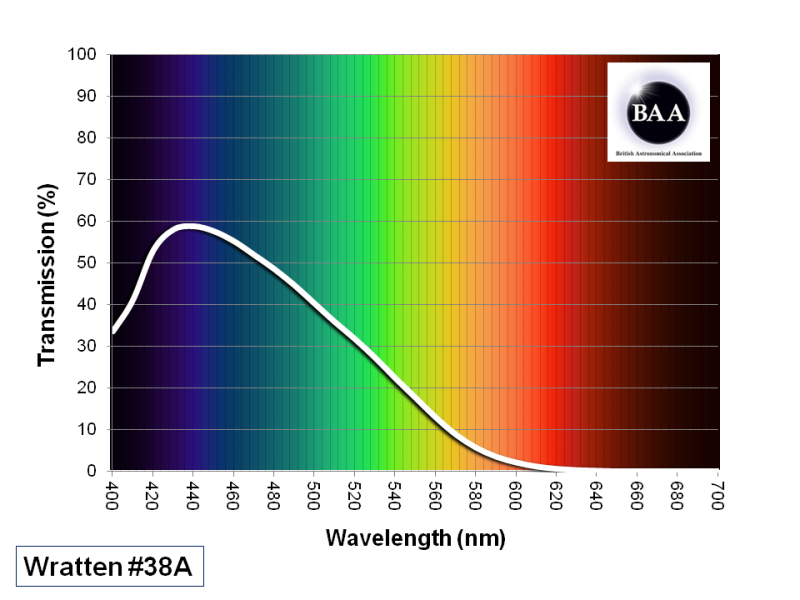 No. 38A Dark Blue
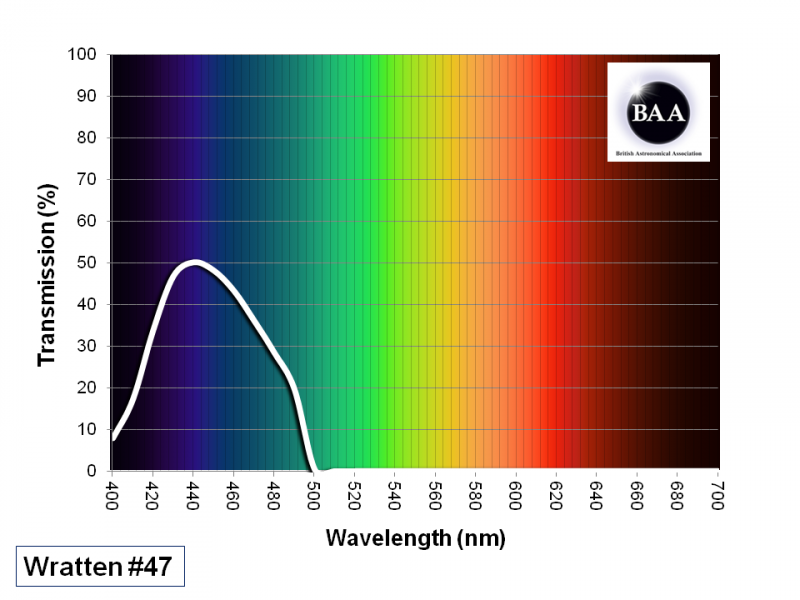 No. 47 Violet
A very dark filter which strongly blocks the red, yellow, and green wavelengths. I would highly recommend it for Venus observation due to its low light transmission of about 5% providing great contrast and enhancing cloud features. Try using it on the Moon to decrease the glare when observing features at a 10-12 day old phase. Some observers report that features in the Schroeter Valley and Aristarchus crater are clearer due to the lack of glare. Recommended for the Moon, especially if you are using a large aperture telescope! This is another colour separation filter that enhances the blue or shorter wavelengths of the spectrum at 450nm.
Additional filters that also are helpful in visual observing are the polarizing filter and the neutral density filter. Both are longpass filters that usually transmit all wavelengths of light but can cut down on glare and contrast.
Non Wratten Filters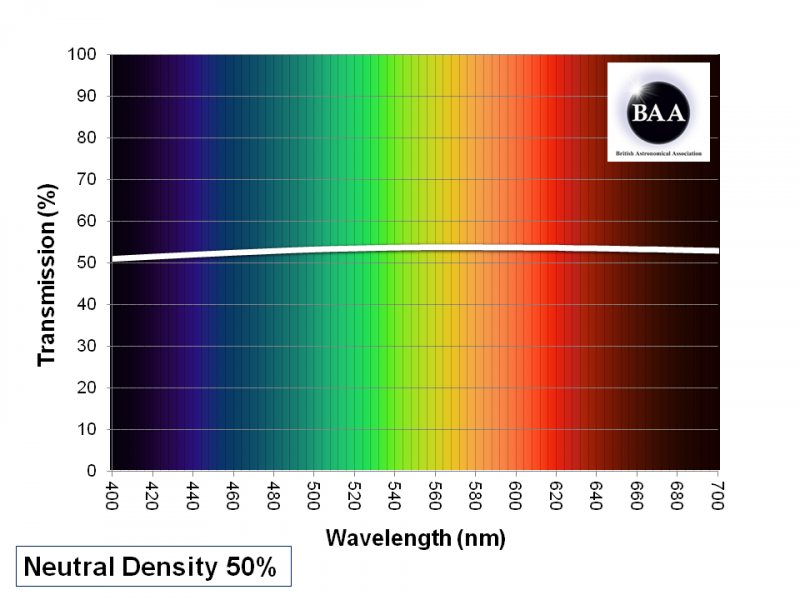 Neutral Density Filters
A neutral density (ND) filter transmits light uniformly across the entire visible spectrum and is an excellent filter to use to reduce glare in such objects as the Moon and planets, but especially the Moon. Due to its bright glare many lunar and planetary astronomers keep an ND filter on their favourite eyepiece and add on other filters as necessary. Neutral density filters come in a variety of densities that reduce the glare in the image based upon the amount of light transmission each ND filter allows. Commonly they come in numbers such as 50, 25 and 13 that signify the amount of light they transmit; 50%, 25% or 13%.
Polarizing filters
Although it does not work at any specific wavelength, the polarizing filter allows light of any wavelength through but blocks those with random scattering patterns allowing only light waves in a flat “plane” through, which has the effect of increasing the contrast, reducing glare and slightly enhancing the saturation of colour in an object. Such filters are very useful on bright objects such as the Moon and some planets.
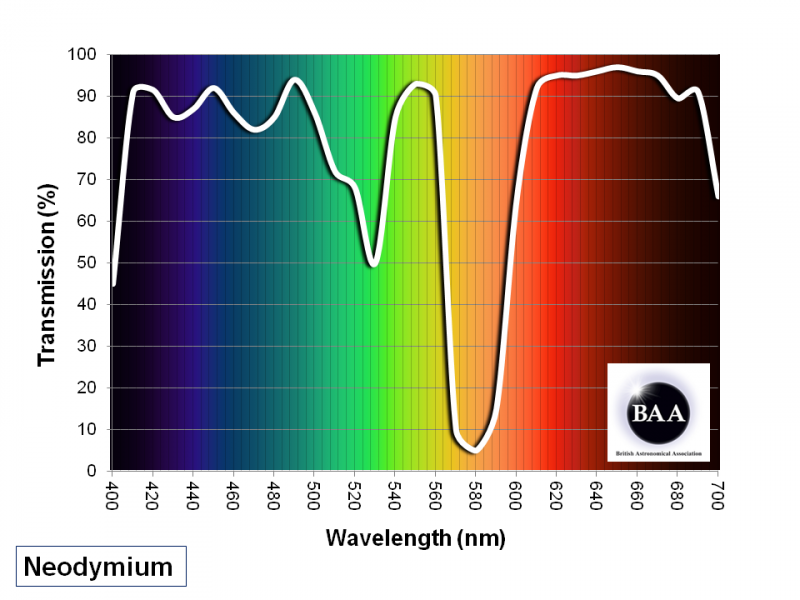 Neodymium Filter
The Neodymium filter is an interesting addition to the filter armoury as it filters the yellow light of the spectrum, rendering most objects a faint blue colour. It is useful for observations of Venus and for Jupiter and Saturn too. Some astronomers report that this is a useful filter for observing in light polluted areas as it cuts through sodium light pollution somewhat, although it is not as effective as a Light Pollution Reduction filter.
Summary
Many planetary observers rely on filters and they report that they really do make a difference in seeing faint details. Filters also reduce the glare of objects like Jupiter, Saturn and the Moon and render a better contrast between their sunlit surface and the dark background sky.
Observers can also be affected by a phenomenon known as prismatic or atmospheric dispersion. This is most evident when a star or planet is seen near the horizon. It results from atmospheric refraction occurring less for the longer wavelength red light where the red appears clearer nearer the horizon and the light shifts to the violet toward the zenith. This is the reason that most astronomers prefer to observe an object when it is near or at culmination (the highest point in the sky as seen from an observers latitude) so that this effect is lessened. Use of red or blue filters on an ascending object may make the difference between seeing details such as the Great Red Spot for example.
I hope that this tutorial shows that coloured filters are a very useful tool in visual astronomy. Using such, I hope that this tutorial gives the reader some tips on which filters to use to observe any of the planets of the solar system and our moon. Most features on planetary surfaces may be quite subtle and filters can make a great difference between seeing or recording a feature or missing it completely in the sky background. For more information on using filters for visual observing or for astrophotography, please see my book Choosing and Using Astronomical Filters.
Martin is the Director of the Brecon Beacons Observatory and an astronomer at Dark Sky Wales.
[The graphical plots in this tutorial have been prepared using copyright free spectroscopic data]
| The British Astronomical Association supports amateur astronomers around the UK and the rest of the world. Find out more about the BAA or join us. |