BAA Photometry Database User Guide to Loading and Editing Observations
Contents
Manually
Entering Observations
Amending
Individual Observations
Important
Loading your observations into the BAA Photometry Database is fantastic way to make your observations available to amateur and professional astronomers alike. However, this should not replace your own records, which should be always be kept as your own master copy of what you have observed.
Uploading Observations
The uploading of observation data files is a 2 stage process.
1. Upload the observations into the holding area of the database.
2. Commit the observations to the live database.
This is to allow observations to be reviewed and warning messages investigated before they appear in the live database.
Note that observers can only upload their own observations, while BAA Officers are able to upload anyone’s observations.
Upload Process
1. Login to the BAA Photometry Database.
2. Click “Upload Observations”.
3. Click “Browse” in Microsoft Edit and Internet Explorer or “Choose Files” in Google Chrome, or a similarly worded button for other web browsers.
· Note many modern browsers support multiple file uploads, but some will only allow 1 file at a time to be uploaded. The latest Google Chrome, MS Edge and Internet Explorer support multiple file uploads.
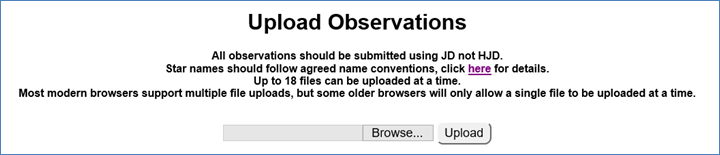
4. Press “Upload”.
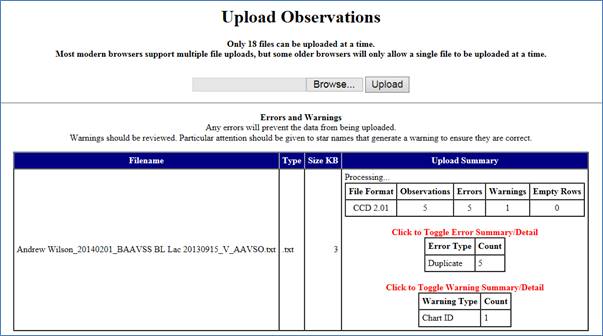
· If you are uploading large files then please be patient as this may take a few seconds to process.
· Once the upload is complete then any “Errors” and “Warnings” will be displayed. By default just the numbers of errors and warnings are displayed. Clicking the red text will give the detailed error or warning messages.
o Any errors will prevent the data being uploaded.
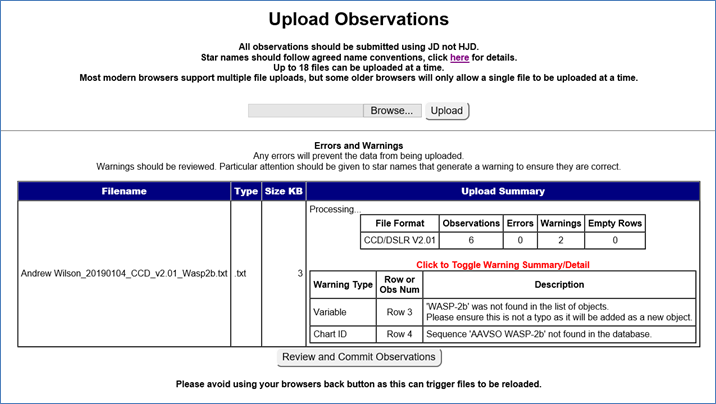
o Warnings are just that. They are worth looking at to make sure there are no unexpected problems with the data. Frequently unrecognised charts / sequences will generate warnings.
5. As long as there are no errors then a “Review and Commit Observations” button will appear at the bottom of the web page. Unless you are going to upload more files you should now click this button.
6. This shows a summary of all uncommitted observations for your login.
· This includes anything you have just uploaded, along with any observations you previously uploaded but did not commit, even if that was several weeks or months ago.
· You can check that the observations are as you expect.
o Stars
o Dates
o Magnitudes
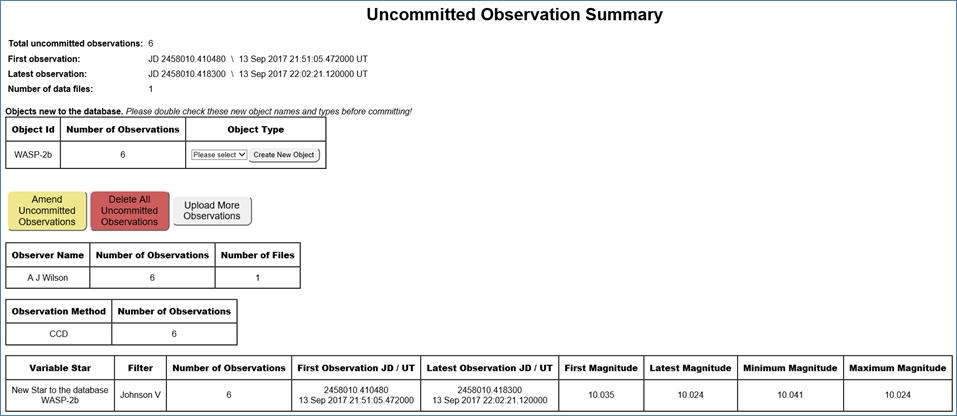
7. If there are any objects in your file that are not already in the database then a list of them will appear near the top of the webpage. You will need to create these objects using the drop down list and buttons before you are able to proceed to commit the observations to the database.
· Before creating the objects please ensure they are not a misspelling of an object already in the database, e.g. “SSCyg” rather than the correct “SS Cyg” with a space.
· To create an object select the correct object type from the drop down list and then press “Create New Object”.
8. Buttons allow you to do the following actions, or you can just leave the page and come back later by selecting “Review and Commit Uploaded Observations” from the homepage.
· Commit All Uncommitted Observations
o Will transfer your observations from the holding area into the live database. They will then be visible to anyone generating light curves or downloading observations.
· Amend Uncommitted Observations
o Enables you to edit observations before you commit them. Often it is better to delete your observations and amend your source file rather than using this web page to edit the observations in the holding area.
o You can also use this to look at your observations in more detail before you load them into the database.
· Delete All Uncommitted Observations
o This will delete the observations you have loaded so they will not be entered into the live database.
· Upload More Observations
o This will take you back to the previous screen so you can upload more files of observations.
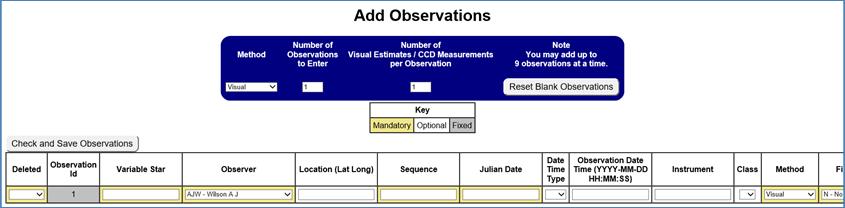
Manually Entering Observations
A web interface has been created to allow the manual entry of up to 9 observations at a time.
· Note that this is a web form and until you press “Check and Save Observations” your observations are not stored anywhere.
· Entering 1 observation at a time is the recommended approach but it is possible to enter up to 9 observations at a time.
1. Login to the BAA Photometry Database website.
2. Click “Manually Enter Observations”.
3. Change the following if required:
· Method
· Number of observations
o Defaults to 1 but can be a number up to 9
· Number of Visual Estimates / CCD Measurements per observation
o Per observation this is how many of the following you expect to enter:
§ For Visual observations the number of estimates per observation, e.g. V=9, C(1)V(2)D.
§ For CCD observations the number of comparison stars.
o 1 to 9 per observation is allowed. Any more must be entered by file upload.
4. The “Reset Blank Observations” button will reset the web form with the number of blank observations and estimates you typed in. Note this will wipe out any observations you have entered without saving them.
5. The columns are colour coded with a key at the top to indicate:
· Mandatory (khaki) – Must be provided
· Optional (white) – May leave blank
· Fixed (grey) – Cannot be edited but provided for information
6. Type in your observation details.
7. Once you have typed in all the details for your observations press the “Check and Save Observations” button.
· Observations will only be saved to the database if no errors are detected.
· There may be warnings.
o The observations will still be loaded into the database but it is a good idea to quickly review any warning messages.
o If the warning were due to a mistake then you can use the “Edit Live Observation” screen to correct them.
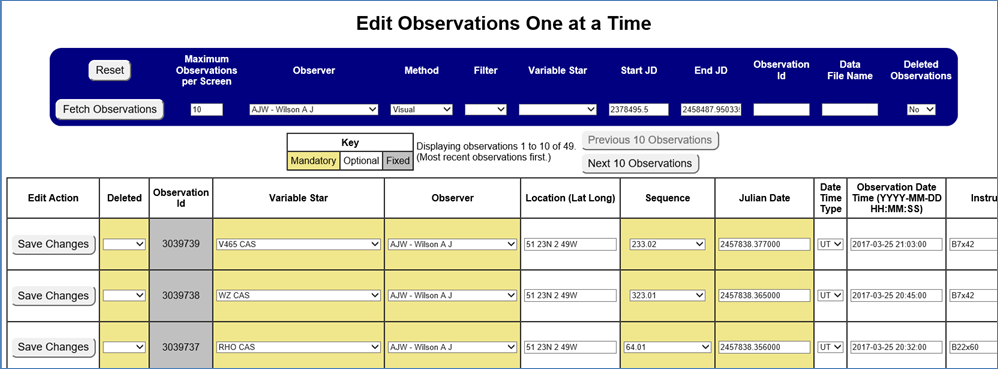
Amending Individual Observations
You can amend live observations or observations you have loaded but not committed with the following screens:
· Edit Live Observations
· Edit Uncommitted Observations
Note that although this screen can show you multiple observations, only 1 observation may be edited at a time. For large scale changes the “Bulk Edit Live Observations” screen should be used, or contact the BAA Photometry Database Manager using the address at the bottom of the homepage.
1. First you must be logged in to the BAA Photometry Database.
2. The edit screens are accessed from the homepage by clicking either “Edit Live Observations One at a Time” or “Edit Uncommitted Observations”.
3. Each page has a set of parameters that a user can enter to select the observations of interest.
4. Once you have selected the observations you wish to view then press “Fetch Observations”.
5. The number of observations displayed at a time is defaulted to 10 but this can be changed up to a maximum of 100 per page.
· This is because creating a larger “form” to edit observations can be very slow and will quickly reach server and browser limits.
· “Previous ..” and “Next ..” buttons are provided to enable you to access observations beyond a single page.
6. Note it is not possible to edit both visual and CCD observations at the same time, as the observations have different layouts.
7. There is colour coding to the columns with a key at the top to indicate which columns are:
· Mandatory (khaki) – Must be entered
· Optional (white) – May leave blank
· Fixed (grey) – Cannot be edited
8. Amendments must be made 1 observation at a time. The “Save Changes” button must be pressed once you have altered the observation and before you start to change the next observation. The “Save Changes” button will:
· This will validate and change the data as long as no errors are detected.
o If errors are detected then the changes will not be saved.
· If you make changes to more than 1 row then only the row where you press “Save Changes” will be altered while the other rows will be reset.
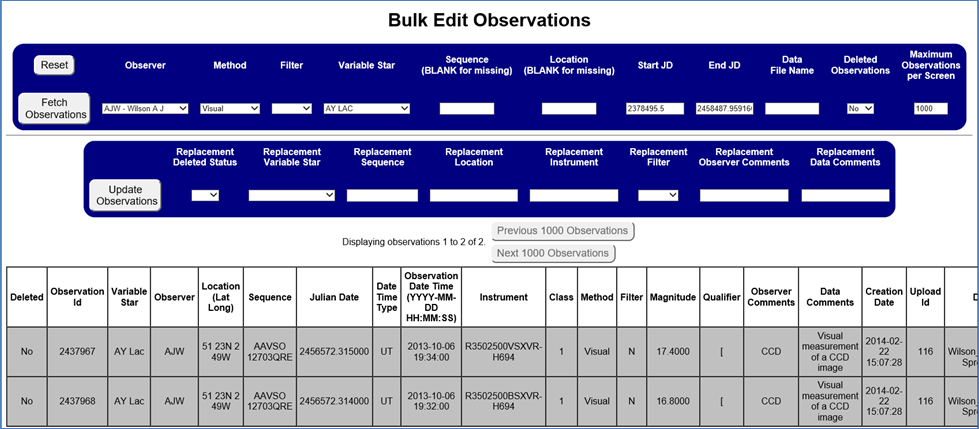
Bulk Editing Observations
There is a dedicated screen for making bulk edits to observations. Only certain fields can be edited in bulk, and limits are put in place to prevent for example editing more than 1 star at a time.
· Great care must be taken when using this screen!
· This screen can be very useful for deleting observations in bulk so that you can reload your file. (Note observations are never actually deleted from the database. Instead they are given a status of deleted which can be reversed.)
1. First you must be logged in to the BAA Photometry Database.
2. Next click “Bulk Edit Live Observations”.
3. The most important selection criteria are:
· Method – Usually Visual, CCD or DSLR.
· Variable Star – Since it is only possible to edit data for 1 star at a time.
4. Make any other selections to narrow down the list of observations.
5. Press “Fetch Observations”.
6. The screen defaults to showing a maximum of 1000 observations, although it can show up to 9999 observations.
7. Observations are not edited by changing values in the table of observations. Instead you are presented with a group of data items which you can change by providing the replacement values.
8. Once you have given the replacement values then click the “Update Observations” button.
· Note this will affect all observations meeting the selection criteria, not just the observations on the page. If the observations are spread across multiple pages then all of those observations will be changed.
· Note this is a dangerous form to use since you can edit many observations with a single click of a button! So please take care when using it.